Matlab & Vivado Cosimulation: Entire Setup & First Runs
Insanity is running the same simulink model over and over again and expecting a different result. That’s insanity - That guy from Farcry… Probably.
Introduction
At my job, we’re working on an optical PLL system. (context paper link for those interrested)
The physics are simulated in MATLAB. Part of this system is the phase recovery algorithm, which is implemented on FPGA.
The MATLAB Simulink model currently implements the phase recovery algorithm using Simulink blocks. The thing is, given how sensitive a closed-loop system can be to delays and noise, this representation is decent but not ideal as we lack the actual hardware behavior (quantizations, real delays, real sampling etc…).
So I recently had what I think is a pretty good idea to tackle more advanced demos with more confidence in our setup:
Instead of modeling our HDL design using Simulink blocks, what if we just used the actual HDL in the simulation?
Which sounds great on paper. In fact, MathWorks had the same idea a long time ago. HDL/Simulink co-simulation is a supported thing since before I was born (I’m exagerating here but yeah it’s not exactly new).
Except it’s a massive pain to set up. Like a real massive pain. And given the time vivado can take to install (2+hours on a good setup), tinkering around to set things up is not only painful, but also very time consuming.
So today, I’ll walk you through my experience getting this co-simulation running, hoping to save you the days of tinkering with Vivado and MATLAB I had to go through to make everything work.
Software Versions
The first thing that took me days to figure out, is the exact version combo that makes things works “flawlessly”.
If you don’t get these versions right, you WILL get segfaults crashes that are non worth trying to fix (I tried but failed miserably and resorted to try and find the optimal verion combo).
So here is the combo that worked for me:
- Vivado 2024.1
- Matlab 2024b
Note I use Ubuntu 24.04.
And that is pretty much it. But it takes so long to install these softwares that the time spent on this part can quickly add up.
You will also need to get all the Matlab HDL Verifier add ons.
You can find the official supported version combos here: https://fr.mathworks.com/matlabcentral/answers/518421-which-versions-of-vivado-are-supported-with-which-release-of-matlab. But this did not work for me so… Yeah.
Drivers Et al.
Before moving on to the Matlab self guided setup, you need to install a whole bunch of drivers (which is a step that isn’t specified anywhere and that you get down by spending hours debuging stuff).
Installing Vivado Cable Drivers.
That should not be a problem as this step is often completed whenever you install vivado on a new linux machine, but just in case, I add it here.
You simply have to execute the very well hidden driver installation script in you vivado installation folder, for me it was:
1
cd /tools/Xilinx/Vivado/2024.1/data/xicom/cable_drivers/lin64/install_script/install_drivers
And then:
1
sudo ./install_drivers
Installing FTD2XX Drivers.
These drivers are supposedly downloaded by matlab when installing the Malab self guided tutorial add ons (we’ll get to that later) But they apparently don’t work, meanning you have to do it yourself.
To do so, go to this link: https://ftdichip.com/drivers/d2xx-drivers/
And download the FTD2XX drivers, a readme.pdf will guide you through the manual installation process.
Handling Libraries
Okay so we just installed some FTD2XX libraries, but vivado somehow what it for its very own self. So we’lll also make a copy of that library into its fil system, especially the /tools/Xilinx/Vivado/2024.1/lib/lnx64.o folder.
1
2
3
4
5
# After installing the FTD2XX libs from FTDI website, copy the lib into vivado's file system:
sudo cp /usr/local/lib/libftd2xx.so.<VERSION> /tools/Xilinx/Vivado/2024.1/lib/lnx64.o/
# create a version-afree link
sudo ln -s /tools/Xilinx/Vivado/2024.1/lib/lnx64.o/libftd2xx.so.<VERSION> \
           /tools/Xilinx/Vivado/2024.1/lib/lnx64.o/libftd2xx.so
The same goes for this library, where you need to make sure it’s there and has a version-free link:
1
2
3
4
5
# check if present
ls /tools/Xilinx/Vivado/2024.1/lib/lnx64.o/libdmgr.so
# if necessary, create a link:
sudo ln -s /tools/Xilinx/Vivado/2024.1/lib/lnx64.o/libdmgr.so.2 \
           /tools/Xilinx/Vivado/2024.1/lib/lnx64.o/libdmgr.so
MATLAB Launch Srcipt / Setup
Once the libraries are well moved into vivado’s file system and linked up, we’ll add this lnx64.o folder to $LD_LIBRARY_PATH before launching Matlab, kinda like a setup.
The most convinient way to do that is to create a launch script
This setup part sill solve 2 problems:
- Ubuntu somehow refuses to make user input work on matlab in some ditros, making us unable to use the software properly (including mine, of course), these is a workaround for that we can add to a launch script. link
- Matlab cannot find essential vivado libraries, we need to add them to
$LD_LIBRARY_PATH.
Here is a script that works for me to fix both these bugs:
1
2
3
4
5
6
7
8
9
10
11
12
13
14
15
16
17
#!/bin/bash

# Linux issues with user inputs workaround https://fr.mathworks.com/support/bugreports/1797911
export ENABLE_QWEBWINDOW=true;

# If repeated segfault, add some swap :
# sudo fallocate -l 32G /swapfile
# sudo chmod 600 /swapfile
# sudo mkswap /swapfile
# sudo swapon /swapfile
# make it perm :
# echo '/swapfile none swap sw 0 0' | sudo tee -a /etc/fstab
# https://adaptivesupport.amd.com/s/question/0D52E00006vFXkwSAG/is-there-a-workaround-for-vivado-rdiprog-crash-during-synth-while-running-20211-on-ubuntu-18046-lts?language=en_US

# Launch Matlab
export LD_LIBRARY_PATH=/tools/Xilinx/Vivado/2024.1/lib/lnx64.o:$LD_LIBRARY_PATH
matlab
Note the swap insctructions, these were a fix I tried when dealing with segfaults because of version incompatibility. I leave it there just in case you still have segfault issues with the same setup as me because this is a potential fix.
Installing Digilent Adept Drivers.
You also have to install the Digilent Adept Drivers. It’s specified nowhere except in burried blog posts on Mathlab forums.
Anyway, go to this link : https://digilent.com/shop/software/digilent-adept/
Create an account and download / install the “Adept Runtime”.
HDL Verifier Self Guided
Okay, now that we have a sane setup, we can finally start trying to work on our co-simulation scenario.
Here I’ll focus on one goal : Simulate one existing hand-written systemVerilog submodule in simulink.
That’s it, but it’s pretty tedious…
Fortunatly for us, Mathworks got us covered with a self guided tutorial we can follow to setup our environement (modulo everything we had to do ourselves before lol).
You can get this tutorial here : https://fr.mathworks.com/matlabcentral/fileexchange/181146-hdl-verifier-self-guided-tutorial.
Go to Files > Download and open the PDF to start follwing the tutorial.
To achieve our previousl stated goal, we need to focus on two parts of this tutorial:
- Hardware Support Package Installation
- Demo 2: HDL Cosimulation with Handwritten HDL Code
You need the proper vivado licences for Part 1. depending on the board you chose to run the setup. Matlab does gives you choice for the board, maybe you can use a lower end board but I dont really know, I used a KC705, which requires a licence. Watch out for that !
1: Hardware Support Package Installation Problems Troubleshoot.
The “Hardware Support Package Installation” step is theorically optional, as our goal is not to use an actual FPGA in-the-loop simulation, but running this correctly proves that all our drivers are well installed and that our setup is tight, which is pretty much mandatory.
The self guided tutorial is pretty straight forward, but in the “Hardware Support Package Installation” step, you may face big challenges to install the hardware support packages.
I personally got an error when trying to install the FTD2XX drivers.
By the way, I tried some versions where I did not get this error for FTD2XX, but still had to install them myself, lol. Great work right there. Anyway, let’s continue…
After some research, in a burried post, we can find a workaround: https://fr.mathworks.com/matlabcentral/answers/2017321-the-404-error-when-installing-hdl-verifier-support-package-for-xilinx-fpga-boards#answer_1575225
The workaround also works like a charm for Linux.
2. HDL Cosimulation errors
Once you tackle the demo 2 using your own code (why should we even use the provided demo after all ?), you may face the following errors:
Timing related
You may face “timing” related errors.
Matlab apparently don’t really like to works with your simulator because it somehow needs to figure out timing (it will not derive it from your clock so we’ll need to help it a little).
Here is an official article that explain this better than I do: https://www.mathworks.com/help/hdlverifier/ug/simulation-timescales.html
In a nutshell, this error can arise for the following reasons:
- You did not specify a timing (so go set one).
- You specified a timing, but because some values are off, Matlab is throwing an error.
So we need need to “specify” that timing relation between the SLX sim and the HDL sim. But what even is that ? and how do we do it ?
Well, this “timing spec” is all about this relationship:
X seconds in simulink sim = X seconds in HDL sim
Of course, you want to aim for 1 second = 1 second so that your sim is as close to real operating conditions as it can be.
To set this up, double click on the HDL imported module > Timescales > Show Times and suggested timescales.
You want the suggested timescales to be 1s = 1s.
But you may not have such recommendation fot he following reasons:
- Your ports sampling rates are not set right (double click the block and > Ports > set all the sampling times to your clock perdiod).
- Your clock is not set right.
- Your clock needs to be a multiple of the precison. (I recommend setting precision to 1ps to avoid worrying about that).
I know the possibility of bending timescales is confusing, I personnally don’t really understand the purpose of all that stuff, but if you apply these tips, you should be able to get that sweet 1s = 1s spot.
No .so found related
If your matlab launch script is well setup, libraries should be found, meaning the errors comes from vivado failling to build simulation files for your design, the main matlab console dumps the vivado outputs, you can use this to investigete.
If vivado successfully built the simulation files, that means you still have some library tinkering to do. refer to the “Installing FTD2XX Drivers.” chapter.
The Actual Cosimulation
Okay, after all of this, you may finally be granted the right to run you simulation.
Here are the I/O of the module I’ll be cosimulating:
1
2
3
4
5
6
7
8
9
10
11
12
13
14
15
16
// num_denum.sv

module num_denum #(
    // input data width
    parameter DATA_WIDTH = 12
)(
    input  logic clk,
    input  logic signed [11:0] I_in,
    input  logic signed [11:0] Q_in,
    output logic signed [50:0] Im,
    output logic signed [50:0] Re
);

// Logic ...

endmodule
Note this is a systemVerilog Module, xsim (Vivado Simulator) was capable of running this simulation flawlessly, which is a good point.
So I import my HDL Module by going into Apps > HDL Verifier > Open HDL Vrifier tab > Import HDL + complete all the shenanigans to import your module (but all of this is covered by demo 2 of the self guided tutorial mentionned before).
Once this is done, I fix all the bugs using the guide above (there WILL be bugs) and Once the simulation accepts to “Run” withou any I/Os, I add some dummy I/Os, in my case, some 10kHz & 11kHz sine waves + some scopes to check out what’s going on in this dummy example.
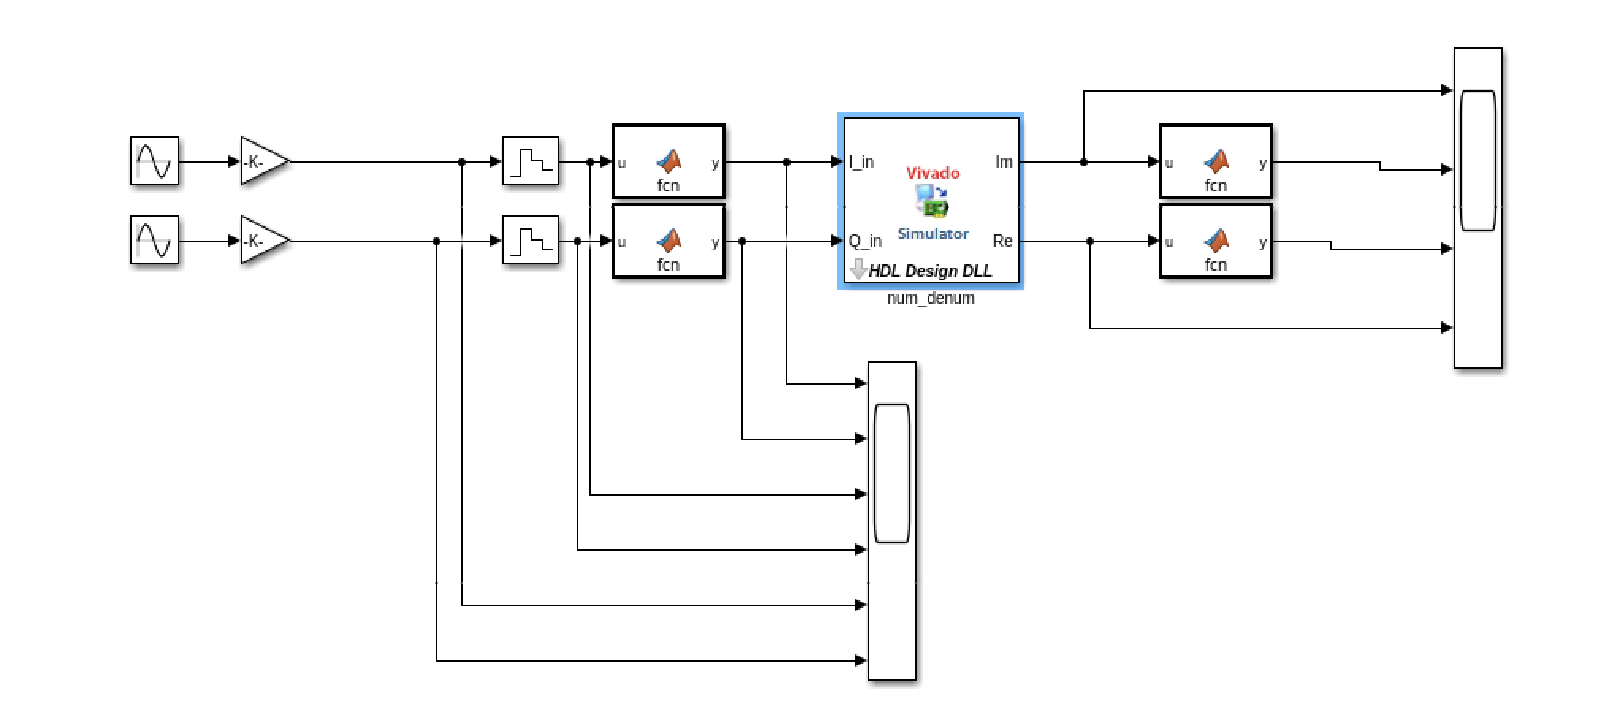
Just a point of attention this Simulink setup you just saw, you will need to adapt the Inputs to the ridgt data type, I personnally use MATLAB function block that uses the fi() object before the input :
% Matlab function @input for conv from whatever matlab uses to 12 bits signed
function y = fcn(u)
    y = fi(u, 1, 12, 0);
end
Also notice the Zero order hold do turn the continuous sine signal into a discrete one, with a hold time of 5ns, as my DUT runs at 200MHz.
And on the ouput, just like in my cocotb testbenches, I use a condition to interpret the outputs as a signed number.
% Output interpretation as 51 bits signed numer
function y = fcn(u)
    if u > 2^50
        y = fi(double(u) - 2^51, 1, 51, 0);
    else
        y = fi(double(u), 1, 51, 0);
    end
end
Here is the scope result after getting the timlescale right (1s = 1000000000ns):
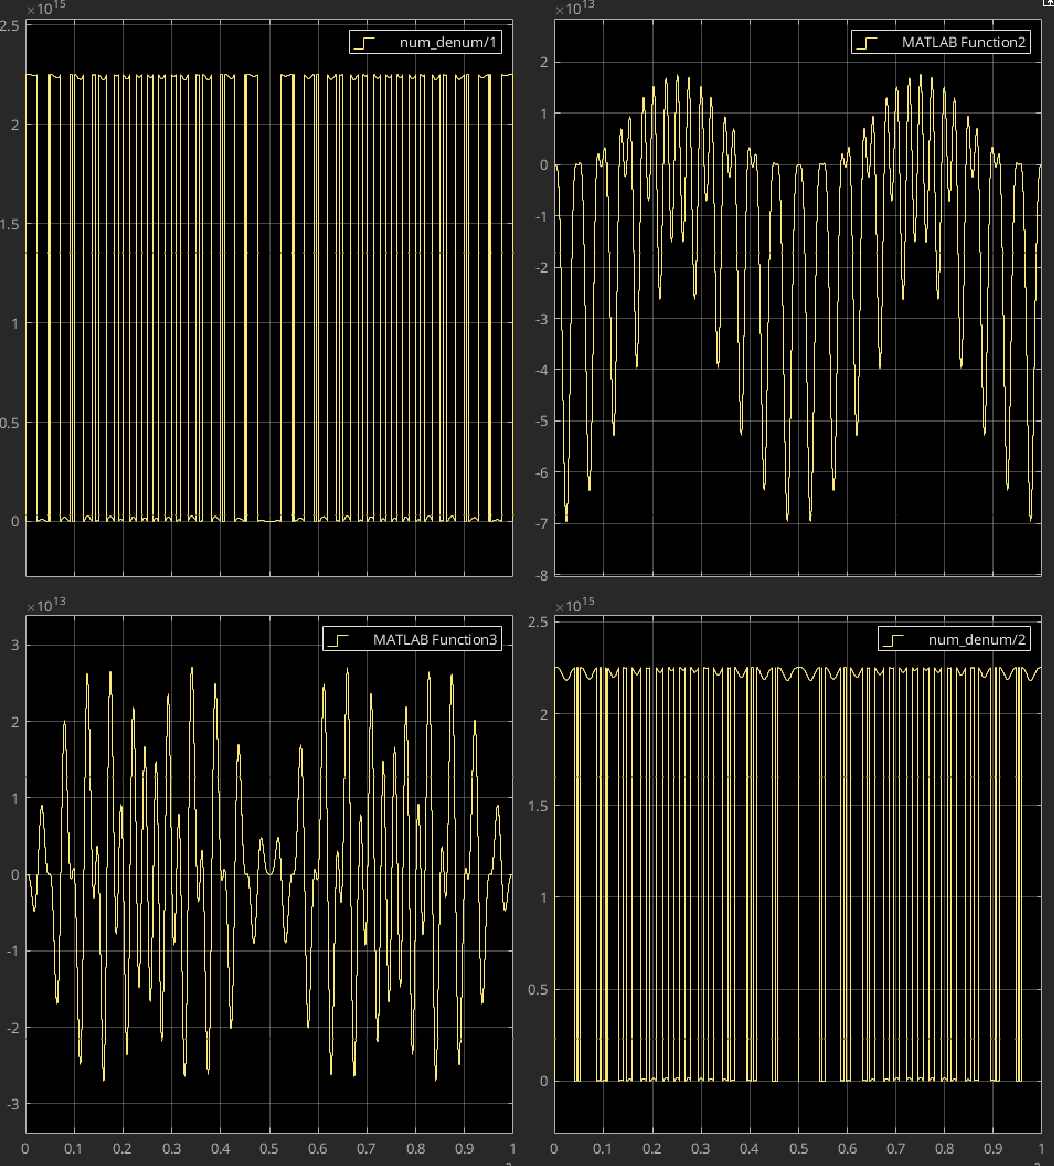
Not too shaby, if we ignore the top lef and bottom right, where number did not go through any sign interpretation layer.
Nevertheless, given how tedious this whole thing was to setup, I has 0 trust in these simlulation results and wanted to verify that matlab was 100% working precisly before moving on to simulate (way more) advanced systems.
So I decided to verify these scopes results against a real cocotb/Verilator testbench, which is a trusted setup for me.
So I reproduced the Exact same Simulink setup into a cocotb testbench case:
1
2
3
4
5
6
7
8
9
10
11
12
13
14
15
16
17
18
19
20
21
22
23
24
25
26
27
28
29
30
31
32
33
34
35
36
37
38
39
40
41
42
43
44
45
46
47
48
49
50
51
52
53
54
55
56
57
58
59
60
61
62
63
64
65
66
67
68
69
70
71
72
73
74
75
76
77
78
79
80
81
82
# test_num_denum.sv

# Imports
import cocotb
from cocotb.clock import Clock
from cocotb.triggers import RisingEdge, Timer
import random
import numpy as np
import matplotlib.pyplot as plt

# ==================
# ...
# other redacted testbenches
# to actually verify the module
# ...
# ==================

# ==================
# And our simulink setup copy to verify matlab results against
# ==================

@cocotb.test()
async def sine_response_test(dut):
    """A dumb test to validate matlab cosim behavior"""
    # Setup clock
    PERIOD = 5e-9 # 200 MHz
    cocotb.start_soon(Clock(dut.clk, 5, units="ns").start())
    STOP_TIME = 1e-3
    I_FREQ = 10e3
    Q_FREQ = 11e3
    samples = int(STOP_TIME/PERIOD)
    t = np.linspace(0, STOP_TIME, samples)

    # create the sins input whith same params as matlab
    I_values = np.sin(t*I_FREQ*2*np.pi)
    Q_values = np.sin(t*Q_FREQ*2*np.pi)

    # convert to signed 12 bits
    I_values = ((np.clip(I_values * 2047, -2048, 2047)).astype(int) & 0xFFF)
    Q_values = ((np.clip(Q_values * 2047, -2048, 2047)).astype(int) & 0xFFF)

    out_Im = np.zeros(samples)
    out_Re = np.zeros(samples)

    for i in range(samples):
        # advance 1 clock edge
        await RisingEdge(dut.clk)

        # apply input values
        dut.I_in.value = int(I_values[i])
        dut.Q_in.value = int(Q_values[i])

        # gather output values
        raw_Im = int(dut.Im.value)
        raw_Re = int(dut.Re.value)
        # Signed, so we interpret it as such (python shenanigans)
        out_Im[i] = raw_Im - 2**51 if raw_Im > 2**50 else raw_Im
        out_Re[i] = raw_Re - 2**51 if raw_Re > 2**50 else raw_Re

        if i%(samples/100) == 0:
            print(i,"/",samples)

    # SIM FINISHED plot I/Os
    fig, axes = plt.subplots(2, 1, figsize=(12, 8))

    axes[0].plot(t, I_values, label='I_in')
    axes[0].plot(t, Q_values, label='Q_in')
    axes[0].set_title('Inputs')
    axes[0].set_xlabel('Time (s)')
    axes[0].legend()
    axes[0].grid(True)

    axes[1].plot(t, out_Im, label='Im')
    axes[1].plot(t, out_Re, label='Re')
    axes[1].set_title('Outputs')
    axes[1].set_xlabel('Time (s)')
    axes[1].legend()
    axes[1].grid(True)

    plt.tight_layout()
    plt.savefig('sim_results.png')
    plt.close()
And I got confirmation that the Simulink results were indeed looking good:
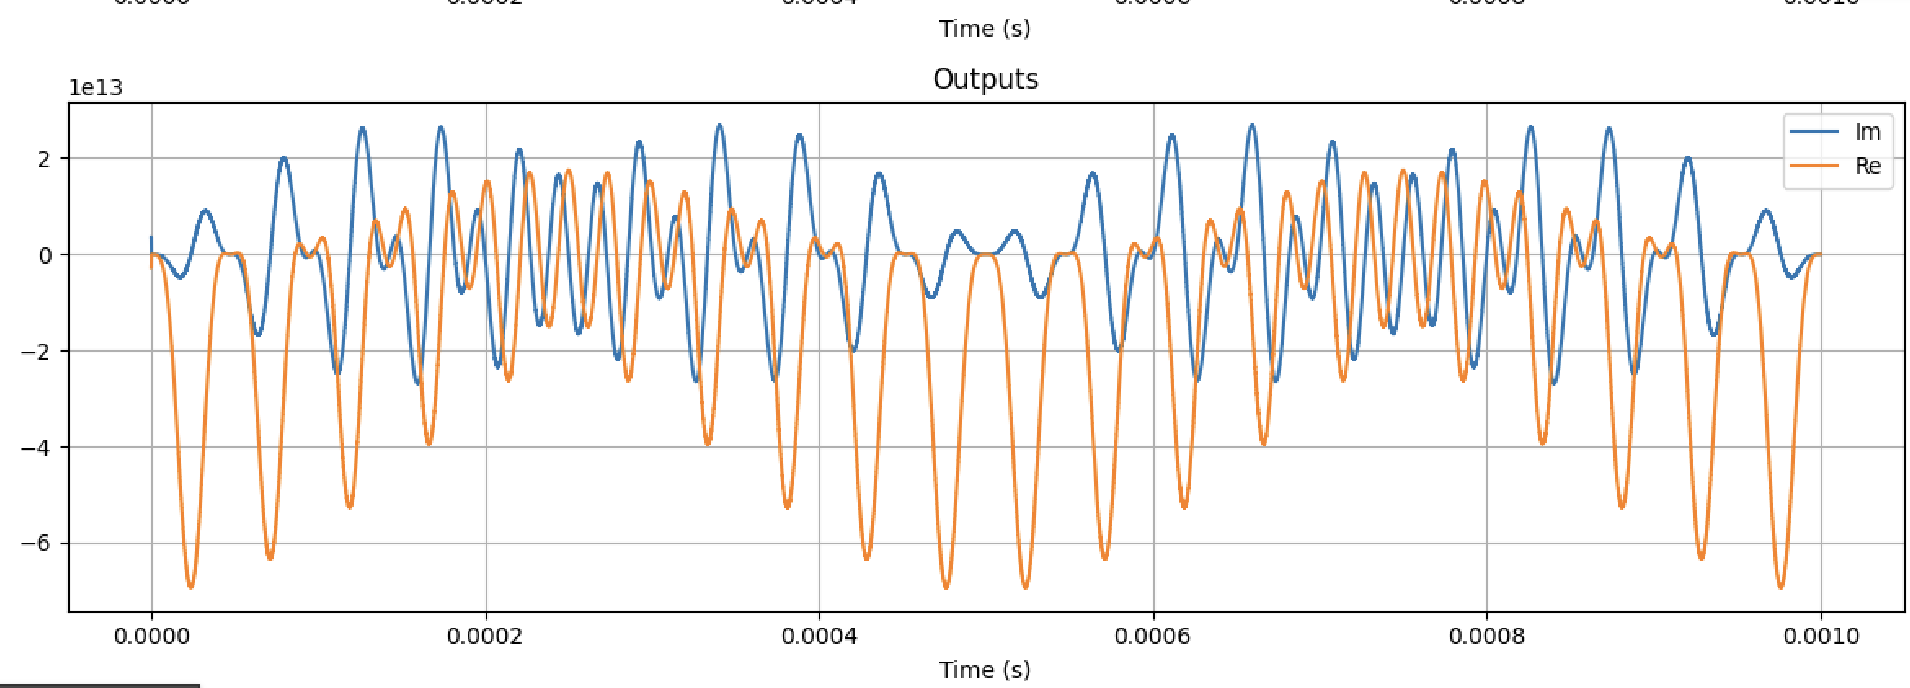
Amplitude, shape and timing seems to match, so we can now be confident that our setup is, finally done.
Now, we may start to actually woprk ! Thank you Mathwork ! (bruh)
UPDATES
In this sections, I will add new fixes i found along the way.
Fixing : “Error while obtaining sizes from MEX S-function”
My error message:
Error:Error while obtaining sizes from MEX S-function 'shdlcosimxsi' in '<blablabl>'.
Caused by:
    Unexpected Standard exception from MEX file.
What() is:basic_string::_M_construct null not valid
..
This error happenned to me because an LUT in the designed was depending on some .mem file.
The best fix for me, was to make the path to this mem file a fixed path to tmp: /tmp/<mem file>.mem.
1
2
3
4
5
6
7
// setting the path as a const prarm to /tmp/
parameter ATAN2_MEM_PATH = "/tmp/atan2_table_signed.mem",

// Load mem file into a ROM in systemVerilog
initial begin
    $readmemh(MEM_PATH, rom);
end
This allows you to easily drop your mem files in /tmp/ and then allows matlab/vivado to hve an easy fixed access to it, which doe exist across all Linux machine.
The only problem is that you need to generate and place the .mem file in /tmp on each new machine and after each reboot.
I personnally documented that at my job in a cosimulation procedure file. But given /tmp exist everywhere, you could easily automate this setup.
Conclusion
And off we go to a better simulation model ! Hope this HDL Verifer troubles verview was useful. This post is mainly a way for we to have some cheat sheets in case I need to have to do the setup again, but who knows, maybe someone will find it helpful !
Thank you for reading to this point. You can write a comment below if you have any questions.
Godspeed
-BRH